If there’s one dish that embodies comfort, tradition, and pure indulgence, it’s roast chicken. Whether it’s a Sunday dinner centerpiece, a go-to meal prep option, or a nostalgic family recipe, this golden, crispy-skinned poultry never fails to impress. The beauty of roasting chicken lies in its simplicity—yet achieving a perfectly cooked bird with juicy meat and crispy skin requires technique, patience, and a few insider secrets.
This guide covers everything from selecting the best poultry to perfecting seasonings, cooking methods, and serving suggestions. You’ll also learn variations from around the world, the best side dishes to complement your meal, and how to store leftovers. By the end of this article, you’ll have mastered the art of roasting chicken, making it a staple in your home-cooked meals.
Part 1: Introduction to Roast Chicken
The Timeless Appeal of Roasting Chicken
Roast chicken is more than just a dish—it’s a culinary tradition passed down through generations. With its crispy golden skin, succulent meat, and rich aroma, it’s no wonder this meal is a household favorite. But what makes it so special?
First, roasted poultry is incredibly versatile. You can season it with simple salt and pepper or go bold with garlic, citrus, and aromatic herbs. Plus, it’s budget-friendly and perfect for feeding a crowd. But beyond its practical benefits, there’s an emotional connection to a home-cooked chicken roast—it brings people together, sparks nostalgia, and feels like a warm hug on a plate.
The History of Roast Chicken
Historically, chicken roasting dates back thousands of years. Ancient Egyptians, Romans, and Greeks all had methods for spit-roasting poultry over open flames. In medieval Europe, roasting whole chickens was a sign of wealth and celebration.
Fast forward to today, and every culture has its take on this dish. From the French Poulet Rôti to the Peruvian Pollo a la Brasa, roasting chicken has evolved into a global culinary masterpiece.
Why Roast Chicken is a Must-Know Recipe
Mastering roast chicken opens the door to a world of cooking possibilities. Here’s why:
- Effortlessly Impressive – A golden, crispy-skinned bird looks stunning on the table.
- Endless Variations – You can tweak seasonings, stuffing, and cooking styles.
- Meal Prep Hero – Leftover roasted chicken works for salads, sandwiches, and soups.
- Nutritionally Balanced – Packed with lean protein, essential vitamins, and minerals.
Before we dive into the techniques for selecting the perfect bird, let’s explore the best types of chicken for roasting in Part 2.
Part 2: Selecting the Perfect Chicken
A great roast chicken starts with choosing the right bird. The quality, size, and type of chicken you select can significantly impact the final dish. But with so many options available—free-range, organic, heritage, or conventional—it’s easy to feel overwhelmed. Let’s break it down so you can pick the best poultry for a perfectly roasted masterpiece.
Understanding Different Chicken Breeds
Not all chickens are created equal. The breed of chicken can affect the texture, flavor, and tenderness of the meat. Here’s a quick guide:
- Cornish Cross – The most common commercial breed, known for its tender, juicy meat and mild flavor.
- Heritage Breeds – Slower-growing chickens like Bresse, Orpington, and Plymouth Rock have more developed flavor but can be slightly tougher.
- Pasture-Raised Chickens – These birds have a richer, more pronounced taste due to their natural diet.
If you prefer a juicier, more tender roast chicken, go for a younger, well-fed bird. Heritage breeds are excellent if you want deeper, more complex flavors.
Free-Range, Organic, or Conventional – Which One to Choose?
The labels on chicken packaging can be confusing. Here’s what they really mean:
1. Free-Range Chicken
These birds have access to the outdoors, meaning they often develop more muscle. As a result, their meat can be firmer but packed with rich flavor.
2. Organic Chicken
Raised without antibiotics, hormones, or synthetic pesticides, organic chicken is a cleaner option. It’s slightly pricier, but if you want natural, healthier meat, it’s worth considering.
3. Pasture-Raised Chicken
These chickens roam freely and eat a natural diet of grass and insects. They tend to have darker, more flavorful meat with a firmer texture.
4. Conventional Chicken
Most store-bought chickens fall into this category. They are affordable, widely available, and tender, but they may contain added water and lack the depth of flavor of free-range or pasture-raised birds.
Best choice for roasting chicken?
If possible, opt for an organic, free-range, or pasture-raised bird for the best taste and quality. However, if you’re on a budget, a high-quality conventional chicken can still deliver great results with the right seasoning and cooking technique.
What’s the Ideal Size for Roasting Chicken?
The size of the chicken matters, especially when considering cooking time, tenderness, and serving portions.
- 2.5 – 4 lbs (1.1 – 1.8 kg) → Ideal for a small family (3-4 people), cooks evenly, and stays juicy.
- 4 – 5.5 lbs (1.8 – 2.5 kg) → Perfect for larger gatherings, but requires longer roasting time.
- 6+ lbs (2.7+ kg) → Best for stuffing, but risks drying out if not properly basted.
For the best balance of tenderness and flavor, go for a 3.5 – 4.5 lb chicken. It’s easier to handle, cooks evenly, and ensures crispy skin with juicy meat.
Pro Tips for Choosing the Best Chicken for Roasting
- Look for a Plump Bird – A well-rounded, meaty chicken ensures juicy bites.
- Check the Skin – It should be smooth and slightly yellowish, not dry or wrinkled.
- Avoid Excess Liquid in Packaging – This could indicate water injection, which dilutes flavor.
- Smell Matters – Fresh chicken should have a mild, clean scent. A strong odor? Avoid it.
- Buy Air-Chilled Chicken – These birds have better skin texture and crisper skin when roasted.
What About Frozen Chicken?
Fresh is best, but if you’re using a frozen chicken, here’s what you need to know:
- Thaw it properly – Always defrost in the fridge for 24-48 hours before roasting.
- Pat it dry – Removing excess moisture helps get that crispy golden skin.
- Season generously – Frozen chickens can lose some natural flavor, so use bold spices and herbs.
Now that you’ve selected the perfect bird, it’s time to prep it for roasting. In the next part, we’ll cover how to clean, season, and truss the chicken for maximum flavor and even cooking.

Part 3: Preparation Techniques for a Perfect Roast Chicken
Once you’ve picked the perfect bird, it’s time to prep it for roasting. The way you clean, season, and truss your chicken can make all the difference between a juicy, flavorful masterpiece and a dry, bland meal. This step is crucial for ensuring even cooking, crispy skin, and bold flavor.
Cleaning and Prepping the Chicken
Before seasoning, you need to prepare the bird properly. Follow these steps to ensure food safety and enhance flavor absorption:
1. Remove Excess Packaging and Giblets
- Take the chicken out of its packaging.
- Remove the giblets (heart, liver, neck) from the cavity. You can save these for gravy or discard them.
2. Rinse or Not? The Debate
- Many chefs recommend not rinsing raw chicken to avoid spreading bacteria.
- Instead, pat the bird dry with paper towels—this removes excess moisture, leading to crispier skin.
3. Let the Chicken Rest at Room Temperature
- Let the chicken sit at room temperature for 30–45 minutes before roasting.
- This prevents cold spots and ensures even cooking.
Marinating vs. Dry Rub: Which is Better?
Both methods have their benefits, but which one should you choose?
Marinating the Chicken
- Adds deep flavor and tenderness by allowing the seasonings to penetrate the meat.
- Works best when left overnight in the fridge.
- Use olive oil, citrus, garlic, and herbs for a balanced flavor.
Using a Dry Rub
- Helps create crispy, golden skin by drawing out moisture.
- Best applied 1-2 hours before roasting.
- Use a mix of kosher salt, black pepper, garlic powder, smoked paprika, and thyme.
👉 Best Approach: Combine both! Marinate the chicken overnight, then apply a dry rub right before roasting for the ultimate flavor boost.
The Art of Trussing: Is It Necessary?
Trussing means tying the chicken’s legs together to help it cook evenly. Here’s why it’s important:
- ✔ Prevents overcooked breast meat while waiting for the thighs to cook.
- ✔ Gives the chicken a compact shape for even roasting.
- ✔ Helps retain moisture inside the cavity.
How to Truss a Chicken (Step-by-Step)
- Cut a piece of kitchen twine about 3 feet long.
- Place the bird breast-side up and tuck the wings under the body.
- Wrap the twine around the legs and pull them together.
- Tie a tight knot to hold everything in place.
No twine? Simply tuck the legs under the body—it won’t be as tight but will still help with even cooking.
Adding Aromatics for Maximum Flavor
For a flavor-packed roast chicken, stuff the cavity with fresh ingredients before roasting. This infuses the meat with fragrant, rich flavors. Try these combinations:
- Classic Herb & Citrus: Lemon slices, garlic cloves, rosemary, thyme.
- Garlic & Butter: Whole garlic bulbs, sage, and softened butter.
- Spiced Mediterranean: Onion, cinnamon stick, bay leaves, sumac.
This small step makes a huge difference in taste, so don’t skip it!
Should You Use Butter or Oil?
Brushing the skin with fat before roasting is crucial for achieving crispy, golden skin. But should you use butter or oil?
🥛 Butter → Adds richness, browns beautifully, but can burn at high temperatures.
🥑 Olive oil → Helps achieve crispier skin and locks in moisture.
👉 Best Choice: Use both! Rub the chicken with oil first, then baste with butter halfway through roasting. This prevents burning while adding a glossy, golden finish.
Final Preparation Steps Before Roasting
- Season generously – Don’t just season the skin! Rub salt, pepper, and spices under the skin and inside the cavity.
- Let the chicken dry out – After seasoning, let the chicken sit uncovered in the fridge for at least an hour. This dries the skin and enhances crispiness.
- Preheat the oven – Always start with a hot oven to sear the skin and lock in juices.
With all the prep work done, you’re now ready to roast your chicken to perfection. In the next part, we’ll cover a foolproof classic roast chicken recipe with step-by-step instructions.
Part 4: Classic Roast Chicken Recipe (Step-by-Step Guide)
Now that your chicken is cleaned, seasoned, and trussed, it’s time for the main event—roasting! This classic roast chicken recipe delivers crispy golden skin, juicy meat, and rich flavor with minimal effort. Follow these detailed step-by-step instructions to achieve the perfect result every time.
Ingredients for the Perfect Roast Chicken
a–For the Chicken:
- ✔ 1 whole chicken (about 3.5 – 4.5 lbs)
- ✔ 2 tbsp olive oil
- ✔ 2 tbsp unsalted butter (softened)
- ✔ 1 tbsp kosher salt
- ✔ 1 tsp black pepper
- ✔ 1 tsp paprika (for a golden color)
- ✔ 1 tsp garlic powder
- ✔ 1 tsp onion powder
- ✔ 1 tsp thyme (dried or fresh)
b-For the Aromatics (Stuffing):
- ✔ 1 lemon, cut into wedges
- ✔ 4 cloves garlic, peeled and smashed
- ✔ 1 small onion, quartered
- ✔ 3 sprigs fresh rosemary
- ✔ 3 sprigs fresh thyme
c-For Basting:
✔ 3 tbsp butter, melted
✔ 1 tsp lemon juice
Step-by-Step Cooking Instructions
1. Preheat the Oven
Set your oven to 425°F (220°C). A high temperature ensures a golden, crispy skin while locking in moisture.
2. Prepare the Chicken
- Remove the chicken from the fridge 30 minutes before roasting to allow it to come to room temperature.
- Pat the skin completely dry with paper towels.
3. Season the Chicken
- In a small bowl, mix salt, pepper, paprika, garlic powder, onion powder, and thyme.
- Rub olive oil all over the chicken to help the seasoning stick.
- Generously season inside the cavity, under the skin, and over the skin.
4. Stuff the Chicken
- Stuff the cavity with lemon wedges, garlic cloves, onion, rosemary, and thyme.
- This infuses the meat with deep, aromatic flavors as it roasts.
5. Truss the Chicken (Optional, but Recommended)
- Tie the legs together using kitchen twine to help retain moisture.
- Tuck the wing tips under the body to prevent burning.
6. Roast the Chicken
- Place the chicken breast-side up on a rack in a roasting pan.
- Roast at 425°F (220°C) for 20 minutes to crisp up the skin.
- Reduce heat to 375°F (190°C) and continue roasting for 45-60 minutes (or until the internal temperature reaches 165°F (75°C) in the thickest part of the thigh).
7. Baste for Extra Flavor
- After 30 minutes, brush the chicken with melted butter mixed with lemon juice.
- Repeat every 15 minutes to develop a rich, golden crust.
8. Check for Doneness
- Insert a meat thermometer into the thickest part of the thigh (without touching the bone).
- The chicken is done when it reads 165°F (75°C).
- If you don’t have a thermometer, pierce the thigh—the juices should run clear, not pink.
9. Let the Chicken Rest
- Transfer the chicken to a cutting board and tent it loosely with foil.
- Let it rest for 15 minutes before carving—this helps redistribute juices and keeps the meat moist.
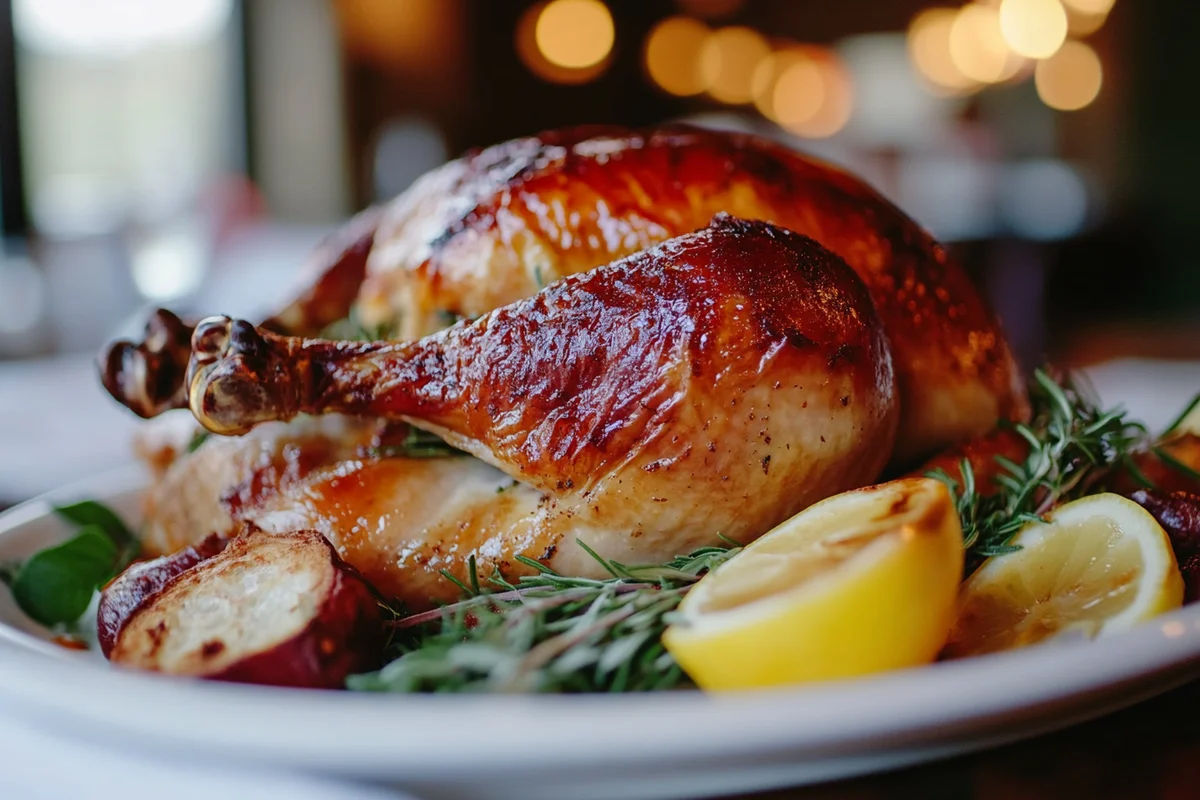
How to Carve a Roast Chicken
Carving a whole chicken might seem intimidating, but it’s simple when done step by step:
- Remove the legs – Slice between the drumstick and thigh, then separate them.
- Cut the wings – Pull them away from the body and cut at the joint.
- Slice the breast meat – Cut along one side of the breastbone, then slice into pieces.
- Enjoy! Serve the carved chicken with your favorite sides and sauces.
Nutritional Information (Per 100g of Roast Chicken)
| Nutrient | Amount |
|---|---|
| Calories | 165 kcal |
| Protein | 31g |
| Fat | 3.6g |
| Carbohydrates | 0g |
| Fiber | 0g |
| Cholesterol | 85mg |
| Sodium | 70mg |
👉 Pro Tip: If you want a healthier version, remove the skin before eating to cut down on fat.
With your roast chicken cooked to perfection, it’s time to explore international variations of this dish. From French-style Poulet Rôti to spicy Indian Tandoori Chicken, the next section covers flavor-packed global twists on this classic recipe.
Part 5: Roast Chicken Variations Across Cultures
While a classic roast chicken is delicious on its own, different cultures around the world have developed unique ways to prepare this dish, using bold seasonings, marinades, and cooking techniques. Whether you crave herb-infused French flavors, smoky Peruvian spices, or the fiery kick of Indian tandoori, there’s a roast chicken variation for every taste.
Let’s explore some of the most iconic global takes on this dish!
French-Style Poulet Rôti
In France, Poulet Rôti (roast chicken) is a staple of Sunday lunches and family gatherings. Unlike heavily spiced versions, this dish focuses on buttery, aromatic simplicity.
What Makes It Unique?
- ✔ Slow-roasted with butter, garlic, and fresh thyme
- ✔ Basted frequently for ultra-crispy golden skin
- ✔ Served with roasted potatoes and a light pan sauce
How to Make It
- Rub the chicken with butter, salt, and herbes de Provence.
- Roast at 375°F (190°C), basting with butter every 15 minutes.
- Serve with a drizzle of pan juices and crispy potatoes.
Peruvian Pollo a la Brasa (Smoky Rotisserie Chicken)
This Peruvian favorite is smoky, spicy, and packed with flavor. Traditionally cooked over charcoal, it features a deep, garlicky marinade with a hint of citrus.
What Makes It Unique?
- ✔ Bold marinade with garlic, cumin, soy sauce, and lime
- ✔ Rotisserie-style roasting for tender, juicy meat
- ✔ Served with aji verde (spicy Peruvian green sauce)
How to Make It
- Marinate the chicken overnight in garlic, soy sauce, cumin, and lime juice.
- Roast at 400°F (200°C) for about an hour, rotating for even cooking.
- Serve with spicy green sauce and crispy yuca fries.
Indian Tandoori Roast Chicken
Inspired by traditional clay oven cooking, Tandoori Roast Chicken is vibrant, smoky, and bursting with warm spices.
What Makes It Unique?
- ✔ Yogurt-based marinade with turmeric, cumin, and coriander
- ✔ Bright red color from paprika or Kashmiri chili powder
- ✔ Charred, smoky flavor from high-heat roasting
How to Make It
- Coat the chicken in a yogurt marinade with garlic, ginger, and spices.
- Let it marinate for at least 4 hours (overnight is best!).
- Roast at 425°F (220°C) until slightly charred.
- Serve with naan bread and cooling cucumber raita.
Moroccan Ras el Hanout Roast Chicken
In Morocco, roast chicken is seasoned with Ras el Hanout, a fragrant spice blend featuring cinnamon, cumin, and cardamom.
What Makes It Unique?
- ✔ Sweet and savory balance from warming spices
- ✔ Stuffed with preserved lemons and olives for deep flavor
- ✔ Served with fluffy couscous and harissa sauce
How to Make It
- Rub the chicken with olive oil, Ras el Hanout, and garlic.
- Stuff the cavity with preserved lemons and green olives.
- Roast at 375°F (190°C) for 90 minutes, basting with juices.
Greek Lemon-Oregano Roast Chicken
Greek roast chicken is all about bright citrus, fresh herbs, and a touch of garlic.
What Makes It Unique?
- ✔ Uses lemon juice and oregano for a fresh, tangy flavor
- ✔ Roasted with potatoes, absorbing all the juices
- ✔ Finished with a drizzle of Greek olive oil
How to Make It
- Rub the chicken with lemon juice, olive oil, garlic, and oregano.
- Roast at 400°F (200°C) with potatoes in the pan.
- Serve with tzatziki and a side of Greek salad.
Which Roast Chicken Style Should You Try?
Each variation has its own unique charm, so why not experiment with different flavors? Whether you want the buttery elegance of French Poulet Rôti or the spicy kick of Tandoori Chicken, there’s a world of delicious possibilities.
In the next part, we’ll explore the best side dishes to pair with your roast chicken—because a great meal isn’t complete without the perfect accompaniments!
Part 6: The Best Side Dishes for Roast Chicken
A perfectly cooked roast chicken is delicious on its own, but the right side dishes can take it to the next level. Whether you’re craving something hearty, refreshing, or indulgent, there’s a perfect side to complement the crispy skin and juicy meat.
Let’s explore the best vegetables, grains, and sauces to serve with your roast chicken!
Classic Vegetable Pairings
Roasting vegetables alongside your chicken is a time-saving, flavor-packed option. The vegetables absorb the rich chicken juices, creating a deep, caramelized taste.

1. Garlic & Herb Roasted Potatoes 🥔
Golden, crispy on the outside, soft on the inside—the ultimate comfort side.
👉 How to Make It:
- Toss baby potatoes with olive oil, salt, pepper, garlic, and rosemary.
- Roast at 400°F (200°C) for 35 minutes, shaking the pan halfway through.
2. Honey Glazed Carrots 🥕
A sweet, buttery contrast to the savory richness of roast chicken.
👉 How to Make It:
- Toss sliced carrots with butter, honey, and cinnamon.
- Roast at 375°F (190°C) for 25 minutes until caramelized.
3. Roasted Brussels Sprouts with Garlic 🌿
A slightly bitter, crispy side that pairs beautifully with juicy chicken.
👉 How to Make It:
- Cut Brussels sprouts in half and toss with olive oil, salt, and minced garlic.
- Roast at 400°F (200°C) for 30 minutes until crispy.
Grains and Starches to Serve with Roast Chicken
If you’re looking for something heartier than vegetables, grains and starches provide a satisfying, filling base for your meal.
4. Buttery Mashed Potatoes 🥣
Creamy, smooth, and packed with buttery goodness—a classic pairing for roast chicken.
👉 How to Make It:
- Boil potatoes until fork-tender.
- Mash with butter, warm milk, salt, and black pepper.
5. Lemon Herb Rice 🍚
A light, fragrant rice dish that balances the richness of roast chicken.
👉 How to Make It:
- Cook basmati rice in chicken broth with lemon zest and parsley.
- Fluff with a fork and serve warm.
6. Crispy Garlic Bread 🍞
Perfect for soaking up those flavorful roasting pan juices.
👉 How to Make It:
- Brush thick slices of bread with garlic butter and toast until crispy.
Fresh & Light Side Dishes
Need something lighter? These refreshing sides add a bright contrast to the rich chicken flavors.
7. Classic Caesar Salad 🥬
Crunchy romaine, creamy dressing, and parmesan shavings make this a perfect match for roast chicken.
👉 How to Make It:
- Toss romaine lettuce with Caesar dressing, croutons, and parmesan cheese.
8. Mediterranean Cucumber Salad 🥒
A cool, crisp salad with a refreshing tang.
👉 How to Make It:
- Combine cucumber, cherry tomatoes, red onion, and feta cheese.
- Dress with olive oil, lemon juice, and oregano.
9. Roasted Garlic Green Beans 🌱
A quick and easy green side with bold garlic flavor.
👉 How to Make It:
- Toss green beans with olive oil, minced garlic, and salt.
- Roast at 400°F (200°C) for 15 minutes.
Sauces & Gravies for Roast Chicken
A great sauce enhances the juiciness of your chicken, adding another layer of depth.
10. Classic Chicken Gravy 🍗
Rich, smooth, and perfect for drizzling over mashed potatoes.
👉 How to Make It:
- Whisk pan drippings with flour and chicken broth until thickened.
11. Chimichurri Sauce 🌿
A zesty, herbaceous sauce that adds brightness to the meal.
👉 How to Make It:
- Blend parsley, garlic, olive oil, and vinegar.
12. Creamy Garlic Aioli 🧄
A buttery, garlicky dip that’s amazing with roasted vegetables.
👉 How to Make It:
- Mix mayonnaise, roasted garlic, lemon juice, and black pepper.
Pairing the Perfect Side Dish
- Want something hearty? Go for mashed potatoes or rice.
- Craving crunch? Try Caesar salad or roasted Brussels sprouts.
- Love bold flavors? Add chimichurri sauce or garlic aioli.
No matter what you choose, these sides will make your roast chicken dinner unforgettable.
Next, we’ll dive into delicious homemade sauces and gravies to take your chicken to the next level!
Part 7: The Best Sauces & Gravies for Roast Chicken
A perfectly cooked roast chicken is already flavorful on its own, but adding a rich sauce or gravy takes it to the next level. Whether you love classic pan gravy, fresh herb sauces, or creamy garlic dips, the right sauce enhances every bite and makes the meal even more indulgent.
Let’s explore the best homemade sauces and gravies that will make your roast chicken unforgettable!
1. Classic Pan Gravy 🍗
This rich, savory gravy is made from chicken drippings, ensuring it’s packed with deep, roasted flavor.
Why It’s the Best:
- ✔ Uses natural chicken juices for the most authentic taste
- ✔ Thick, silky texture that coats every bite
- ✔ Perfect for mashed potatoes and stuffing
How to Make It:
- After roasting, remove the chicken from the pan and set it aside.
- Place the pan on the stove over medium heat.
- Sprinkle 2 tbsp flour into the drippings and whisk for 2 minutes.
- Slowly pour in 1 ½ cups chicken broth, whisking continuously.
- Cook until thickened, then season with salt, pepper, and a splash of lemon juice.
- Strain for a smooth texture and serve warm!
👉 Pro Tip: If you like extra depth, add a splash of soy sauce or Worcestershire sauce.
2. Zesty Chimichurri Sauce 🌿
If you want a bright, herby contrast to the rich roast chicken, chimichurri is the way to go! This Argentinian sauce adds a fresh, garlicky punch.
Why It’s the Best:
- ✔ Fresh and vibrant—a perfect balance for crispy chicken skin
- ✔ No cooking required, just blend and serve
- ✔ Adds a Mediterranean touch to your dish
How to Make It:
- In a blender, combine:
- ½ cup fresh parsley
- 3 cloves garlic
- 1 tsp oregano
- ½ tsp red pepper flakes
- ¼ cup olive oil
- 2 tbsp red wine vinegar
- Salt and black pepper to taste
- Blend until smooth and drizzle over your sliced roast chicken.
👉 Pro Tip: If you prefer a creamier texture, add half an avocado before blending!
3. Creamy Garlic Aioli 🧄
This buttery, garlicky dipping sauce is perfect for roast chicken, roasted veggies, or crispy potatoes.
Why It’s the Best:
- ✔ Adds a luscious, creamy texture to your meal
- ✔ A bold garlic kick that enhances savory flavors
- ✔ Simple and quick—ready in just 5 minutes
How to Make It:
- In a small bowl, mix:
- ½ cup mayonnaise
- 1 tbsp lemon juice
- 2 cloves roasted garlic (mashed)
- ½ tsp Dijon mustard
- Salt and black pepper to taste
- Stir well until smooth and creamy.
- Serve as a dip for chicken, fries, or roasted vegetables.
👉 Pro Tip: Want to make it healthier? Swap mayo for Greek yogurt!
4. Honey Mustard Sauce 🍯
For a sweet and tangy kick, honey mustard sauce is the perfect match for crispy-skinned roast chicken.
Why It’s the Best:
- ✔ Sweet and savory with a hint of spice
- ✔ Perfect for dipping or drizzling
- ✔ Great for kids and adults alike
How to Make It:
- In a bowl, whisk together:
- 3 tbsp honey
- 2 tbsp Dijon mustard
- 1 tbsp olive oil
- ½ tsp garlic powder
- Salt and black pepper to taste
- Serve immediately or refrigerate for later use.
👉 Pro Tip: Add a pinch of cayenne pepper if you like a little heat!
5. Lemon Butter Sauce 🍋
For a silky, citrusy sauce that enhances the natural flavors of roast chicken, this lemon butter sauce is a must-try.
Why It’s the Best:
- ✔ Light, fresh, and pairs well with herb-seasoned chicken
- ✔ Adds a hint of tangy brightness without overpowering
- ✔ Perfect for drizzling over sliced chicken and roasted veggies
How to Make It:
- Melt 3 tbsp butter in a small saucepan over low heat.
- Stir in 2 cloves minced garlic and cook for 1 minute.
- Add ¼ cup chicken broth and 2 tbsp lemon juice, then simmer for 2 minutes.
- Remove from heat and whisk in 1 tbsp fresh parsley.
- Drizzle over the chicken and enjoy!
👉 Pro Tip: For extra richness, add a splash of heavy cream!
Which Sauce Should You Try?
🔥 Love bold flavors? Go for chimichurri or honey mustard.
🧄 Want something creamy? Try garlic aioli.
🍗 Craving a classic? Stick with chicken gravy.
🍋 Need something fresh? Lemon butter is your best bet!
Sauces are an easy way to customize your roast chicken experience, so don’t be afraid to mix and match!
Now that you have the perfect roast chicken and sauces, it’s time to learn pro tips for achieving the ultimate crispy, juicy result.
Part 8: Pro Tips for the Perfect Roast Chicken
A great roast chicken isn’t just about throwing a bird in the oven—it’s about technique, precision, and a few expert tricks. Even small adjustments can make the difference between dry, bland chicken and a golden, juicy masterpiece.
Here are the best pro tips to ensure your roast chicken turns out crispy on the outside, tender on the inside, and bursting with flavor!
1. Always Pat the Chicken Dry for Crispy Skin
Moisture is the enemy of crispiness. If the skin is wet, it will steam instead of roasting.
How to Fix It:
✔ Use paper towels to pat the chicken dry before seasoning.
✔ For extra crispiness, leave the chicken uncovered in the fridge for at least an hour before roasting.
👉 Pro Tip: If you have time, let it dry out overnight in the fridge!
2. Season Under the Skin for More Flavor
Most people only season the surface, but for deeper flavor, you need to go under the skin.
How to Do It:
✔ Carefully loosen the skin from the breast and thighs using your fingers.
✔ Spread butter, olive oil, or dry seasoning mix directly onto the meat.
👉 Pro Tip: Use a mix of butter, garlic, lemon zest, and herbs for the best taste!
3. Use High Heat First, Then Lower It
Starting at a high temperature gives the skin that golden, crispy finish. Lowering it allows the meat to cook through without drying out.
Best Temperature Strategy:
🔥 425°F (220°C) for 20 minutes – To crisp up the skin
♨️ 375°F (190°C) for the remaining time – To ensure juicy, even cooking
👉 Pro Tip: If the skin starts getting too dark, loosely tent it with foil while finishing the cooking process.
4. Baste Smart – But Not Too Much!
Basting helps enhance flavor and moisture, but over-basting can prevent the skin from crisping.
When to Baste:
✔ Baste with butter or pan juices every 15-20 minutes.
✔ Stop basting in the last 20 minutes for extra crispy skin.
👉 Pro Tip: Use a pastry brush or spoon to avoid cooling the oven when opening the door.
5. Use a Meat Thermometer (No Guesswork!)
One of the biggest mistakes is overcooking the chicken. The best way to ensure perfect doneness is with a meat thermometer.
How to Check for Doneness:
- ✔ Insert a meat thermometer into the thickest part of the thigh (without touching bone).
- ✔ The chicken is ready when it reaches 165°F (75°C).
- ✔ If you don’t have a thermometer, pierce the thigh—the juices should run clear, not pink.
👉 Pro Tip: Let the chicken rest before slicing to retain its juices!
6. Let the Chicken Rest Before Carving
Resting is essential—if you cut the chicken immediately, all the juices will run out, leaving it dry.
How Long to Rest:
✔ 10-15 minutes under a loose foil tent.
✔ This allows the juices to redistribute, keeping the meat moist.
👉 Pro Tip: Don’t cover it too tightly, or the steam will soften the crispy skin!
7. Roast on a Rack for Even Cooking
If your chicken sits directly in the pan, the bottom can become soggy. Elevating it helps air circulate for even browning.
How to Fix It:
✔ Place the chicken on a wire rack inside the roasting pan.
✔ No rack? Use chopped onions, carrots, and potatoes as a natural roasting base.
👉 Pro Tip: Roasting over vegetables adds extra flavor to the drippings—perfect for gravy!
8. Flip the Chicken for Extra Juiciness (Optional Trick!)
For super juicy breast meat, some chefs flip the chicken upside down for the first part of roasting.
How It Works:
✔ Roast breast-side down for the first 30 minutes.
✔ Flip it breast-side up for the rest of the time to crisp up the skin.
👉 Pro Tip: This technique keeps the breast from drying out, as the juices flow downward.
9. Don’t Forget the Drippings – They’re Liquid Gold!
The juices left in the pan after roasting are packed with rich, roasted flavor. Don’t waste them!
How to Use Them:
- ✔ Whisk into a quick gravy (see Part 7 for recipe!).
- ✔ Drizzle over roasted veggies or mashed potatoes.
- ✔ Use as a base for soups or sauces.
👉 Pro Tip: Strain out the fat and freeze the drippings for future use!
10. Experiment with Different Seasonings & Marinades
Once you’ve mastered classic roast chicken, try switching up flavors!
Flavor Ideas to Try:
🌿 Mediterranean: Lemon, oregano, garlic, and olive oil
🌶 Spicy Cajun: Smoked paprika, cayenne, and thyme
🍊 Citrus Herb: Orange zest, rosemary, and honey
👉 Pro Tip: Try dry-brining the chicken overnight with salt and spices for deeper flavor.
Final Thoughts: Mastering the Art of Roast Chicken
With these pro chef tips, you’ll never have bland, dry chicken again! By using proper seasoning, temperature control, and resting time, you’ll get a crispy, juicy, and flavorful bird every time.
Next, we’ll dive into the best way to carve and serve your roast chicken like a pro!
Part 9: How to Carve and Serve Roast Chicken
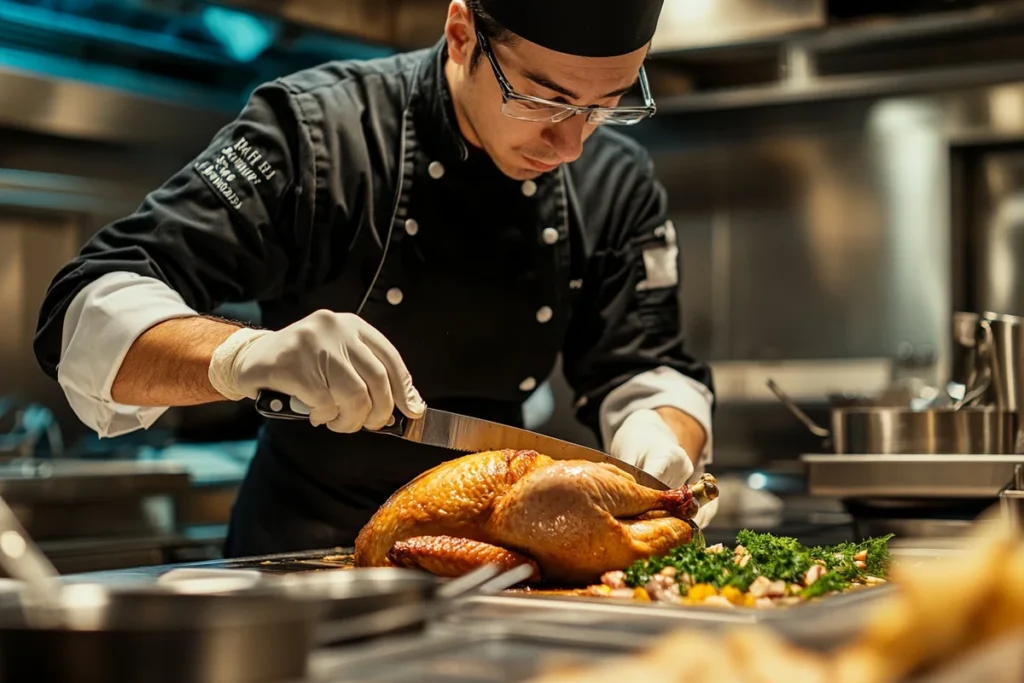
After roasting the perfect chicken, the final step is just as important—carving it correctly. A well-carved chicken ensures that every bite is juicy and tender, prevents waste, and makes for a beautiful presentation on the plate.
In this guide, we’ll cover step-by-step carving techniques, plating tips, and serving ideas to impress your guests!
1. Tools You Need for Carving
Before you begin, make sure you have the right tools to make carving smooth and effortless.
- ✔ Sharp Chef’s Knife or Carving Knife – A dull blade will tear the meat instead of slicing it cleanly.
- ✔ Carving Fork – Helps stabilize the chicken while slicing.
- ✔ Cutting Board with a Groove – A groove helps catch any juices and prevents mess.
- ✔ Tongs (Optional) – Useful for holding hot chicken parts in place.
👉 Pro Tip: If you don’t have a carving knife, use a sharp kitchen shears to cut through joints easily.
2. Let the Chicken Rest Before Carving
🔥 Why It Matters: If you carve immediately, all the juices will run out, leaving the meat dry.
How Long to Rest?
✔ Let the chicken rest for 10-15 minutes before slicing.
✔ Keep it loosely covered with foil to retain warmth without trapping steam.
👉 Pro Tip: Resting allows the juices to redistribute, making each piece tender and moist.
3. Step-by-Step Carving Guide
Follow this simple method to get perfectly cut pieces of chicken breast, thighs, wings, and drumsticks.
Step 1: Remove the Legs and Thighs
- 1️⃣ Place the chicken breast-side up on your cutting board.
- 2️⃣ Use a sharp knife to cut through the skin between the leg and body.
- 3️⃣ Pull the leg away gently until the thigh joint pops out.
- 4️⃣ Slice through the joint to completely separate the leg and thigh.
- 5️⃣ Repeat on the other side.
👉 Pro Tip: If you like crispy chicken skin, keep the skin intact while cutting.
Step 2: Separate the Drumsticks from the Thighs
- 1️⃣ Hold the leg steady with a fork or tongs.
- 2️⃣ Slice through the joint between the drumstick and thigh—it should cut easily.
- 3️⃣ Set aside and repeat for the other leg.
🍗 Now you have 2 drumsticks and 2 thighs ready to serve!
Step 3: Remove the Wings
- 1️⃣ Find the joint where the wing connects to the body.
- 2️⃣ Cut through the joint, pulling the wing away as you slice.
- 3️⃣ Repeat on the other side.
👉 Pro Tip: If you love crispy wings, save them for snacking or dipping in sauce!
Step 4: Carve the Chicken Breast
- 1️⃣ Make a long cut down the center of the breastbone.
- 2️⃣ Slice along the ribs, following the natural curve of the breast.
- 3️⃣ Gently pull the meat away and cut into slices.
🍽 Now you have juicy, even slices of white meat!
4. How to Plate and Serve Roast Chicken
A beautifully plated roast chicken makes any meal feel more special. Here’s how to present it like a pro:
1. Arrange by Color & Texture
✔ Place dark meat (thighs & drumsticks) on one side for contrast.
✔ Layer sliced chicken breast on the other side for a clean presentation.
2. Garnish for Extra Appeal
✔ Add fresh herbs like rosemary or thyme for fragrance.
✔ Place lemon wedges around the plate for a bright pop of color.
3. Serve with the Right Accompaniments
✔ Drizzle with pan drippings or gravy for extra juiciness.
✔ Pair with roasted potatoes, rice, or a fresh salad.
👉 Pro Tip: Serve with a small bowl of sauce on the side so guests can customize their flavor!
5. What to Do with Leftover Chicken?
If you have extra chicken, don’t let it go to waste! Here are some quick and easy ways to repurpose it:
- ✔ Chicken Salad – Mix with Greek yogurt, celery, and spices for a healthy lunch.
- ✔ Chicken Sandwiches – Layer with lettuce, cheese, and aioli on a toasted bun.
- ✔ Chicken Tacos – Shred and toss with lime juice, cumin, and cilantro for a Mexican twist.
- ✔ Chicken Soup or Broth – Simmer bones and meat with garlic, onion, and herbs for a comforting broth.
👉 Pro Tip: Store leftovers in an airtight container in the fridge for up to 4 days, or freeze for up to 3 months.
Final Thoughts on Carving & Serving Roast Chicken
Carving a roast chicken the right way ensures tender, juicy pieces and makes serving effortless. With a sharp knife, proper resting time, and a few plating tricks, you can turn your homemade roast chicken into a restaurant-quality dish.
Now that you’ve mastered cooking, carving, and serving, let’s talk about how to store and reheat leftovers while keeping them moist and flavorful!
Part 10: How to Store & Reheat Leftover Roast Chicken
No one likes dry, rubbery leftover chicken, but with the right storage and reheating methods, you can keep it moist, flavorful, and just as delicious as the first day.
In this guide, you’ll learn how to store roast chicken properly, the best ways to reheat it without drying it out, and creative ideas to repurpose leftovers into delicious meals.
1. How to Store Leftover Roast Chicken
Proper storage keeps chicken fresh, prevents bacteria growth, and locks in moisture.
Short-Term Storage (Refrigerator)
- ✔ Let the chicken cool to room temperature (but don’t leave it out for more than 2 hours).
- ✔ Store in an airtight container or wrap tightly in plastic wrap or aluminum foil.
- ✔ Keep it in the coldest part of the fridge (not the fridge door).
- ✔ Consume within 3–4 days for the best quality.
👉 Pro Tip: Store chicken in small portions to make reheating easier and quicker!
Long-Term Storage (Freezer)
- ✔ Let the chicken cool completely before freezing.
- ✔ Wrap it tightly in plastic wrap, then place it in a freezer-safe bag or container.
- ✔ Label with the date to track freshness.
- ✔ Can be stored for up to 3 months.
👉 Pro Tip: If freezing shredded chicken, add a small amount of broth or drippings before freezing to keep it moist.
2. Best Ways to Reheat Leftover Roast Chicken
Reheating the wrong way can dry out the meat or make the skin soggy. Here’s how to do it correctly:
Oven (Best for Whole Pieces or Bone-In Chicken)
🔥 Best for: Keeping the skin crispy and the meat juicy.
🕒 Time: 15-20 minutes
- ✔ Preheat the oven to 350°F (175°C).
- ✔ Place chicken in a baking dish and add a few tablespoons of chicken broth or water.
- ✔ Cover loosely with foil to trap moisture.
- ✔ Heat for 15–20 minutes, then remove the foil for the last 5 minutes to crisp the skin.
👉 Pro Tip: Brush with melted butter or olive oil before reheating to enhance moisture and flavor.
Stovetop (Best for Shredded or Boneless Chicken)
🔥 Best for: Quick reheating while keeping it moist.
🕒 Time: 5–10 minutes
- ✔ Heat a non-stick pan over medium heat.
- ✔ Add a splash of chicken broth or olive oil.
- ✔ Stir occasionally until heated through.
👉 Pro Tip: Add a squeeze of lemon or fresh herbs at the end for a fresh boost of flavor!
Microwave (Fastest Method, But Use With Caution)
🔥 Best for: Small portions or shredded chicken.
🕒 Time: 1–2 minutes
- ✔ Place chicken on a microwave-safe plate.
- ✔ Cover with a damp paper towel to retain moisture.
- ✔ Heat in 30-second intervals, checking frequently to avoid overheating.
👉 Pro Tip: Avoid microwaving bone-in chicken—it heats unevenly and can dry out.
Air Fryer (Best for Crispy Leftovers)
🔥 Best for: Reheating crispy-skinned chicken pieces.
🕒 Time: 4–6 minutes
- ✔ Preheat the air fryer to 375°F (190°C).
- ✔ Place chicken in a single layer in the basket.
- ✔ Heat for 4–6 minutes, flipping halfway through.
👉 Pro Tip: This method revives crispy skin without making it greasy!
3. Creative Ways to Use Leftover Roast Chicken
Leftover roast chicken can be transformed into new dishes, making meal prep easier and more exciting.
1. Chicken Salad Wraps 🥗🌯
✔ Shred leftover chicken and mix with Greek yogurt, mustard, and celery.
✔ Wrap in lettuce leaves or a whole-wheat tortilla.
2. Chicken Fried Rice 🍚
✔ Sauté leftover chicken with rice, soy sauce, eggs, and vegetables for a quick dinner.
3. BBQ Pulled Chicken Sandwiches 🍔
✔ Toss shredded chicken in barbecue sauce and serve on a toasted bun.
4. Chicken Soup or Broth 🍲
✔ Simmer the leftover bones with onions, carrots, and herbs for a rich, homemade broth.
5. Chicken Tacos 🌮
✔ Season with lime juice, cumin, and paprika, then serve with tortillas and toppings.
Final Thoughts on Storing & Reheating Roast Chicken
With the right storage and reheating techniques, your leftover roast chicken will stay juicy, flavorful, and satisfying. Whether you’re keeping it simple or transforming it into a brand-new dish, these tips ensure nothing goes to waste.
Now that you’ve mastered cooking, carving, and reheating, let’s answer the most common questions about roast chicken in our next section!
Part 11: FAQs: Answering Common Questions About Roast Chicken
Roast chicken is a beloved dish worldwide, but even seasoned cooks have questions about achieving the perfect roast. Here, we address some of the most frequently asked questions to help you master this classic meal.
1. What is the ideal oven temperature for roasting a chicken?
Answer: Preheat your oven to 425°F (220°C). This high temperature ensures the skin becomes crispy while keeping the meat juicy. Roast the chicken until the internal temperature of the thickest part of the thigh reaches 165°F (74°C).
2. How can I ensure my roast chicken stays moist?
Answer: To maintain moisture:
- Brine the chicken: Soak it in a saltwater solution before roasting.
- Use a meat thermometer: Avoid overcooking by checking for doneness at 165°F (74°C).
- Let it rest: After roasting, allow the chicken to rest for about 10-15 minutes before carving to let the juices redistribute.
3. Should I cover the chicken with foil while roasting?
Answer: It’s not necessary to cover the chicken with foil for the entire roasting time. However, if the skin browns too quickly, you can tent a piece of foil over the top to prevent burning while the rest cooks through.
4. Is it better to roast a chicken on a rack?
Answer: Using a roasting rack elevates the chicken, allowing air to circulate and promoting even cooking. It also helps the skin crisp up all around. If you don’t have a rack, placing the chicken on a bed of vegetables works well and adds flavor.
5. How do I know when my roast chicken is done?
Answer: The most reliable method is using a meat thermometer. Insert it into the thickest part of the thigh without touching the bone. When it reads 165°F (74°C), the chicken is safely cooked. Additionally, the juices should run clear when the meat is pierced.
6. Can I stuff the chicken before roasting?
Answer: Yes, you can stuff the chicken. However, ensure the stuffing reaches an internal temperature of 165°F (74°C) to prevent foodborne illness. Be aware that stuffing can increase the overall cooking time.
7. How long should I let the chicken rest after roasting?
Answer: Allow the chicken to rest for 10-15 minutes before carving. This resting period lets the juices redistribute throughout the meat, resulting in a juicier and more flavorful chicken.
8. What’s the best way to season a roast chicken?
Answer: A simple seasoning of salt, pepper, and olive oil is classic and delicious. For added flavor, consider rubbing the chicken with a mixture of herbs like rosemary, thyme, and lemon zest. Placing aromatics such as garlic cloves, lemon halves, or fresh herbs inside the cavity also infuses the meat with subtle flavors.
9. Can I roast a frozen chicken?
Answer: It’s recommended to fully thaw the chicken before roasting to ensure even cooking. Roasting a frozen chicken can lead to uneven cooking, where the exterior may overcook while the interior remains undercooked.
10. How can I achieve extra crispy skin on my roast chicken?
Answer: For crispy skin:
- Pat the chicken dry: Remove excess moisture from the skin before seasoning.
- Air-dry in the fridge: After seasoning, place the chicken uncovered in the refrigerator for a few hours or overnight to dry out the skin.
- High initial heat: Start roasting at a higher temperature (around 425°F or 220°C) for the first 20 minutes, then reduce the heat to ensure the meat cooks evenly.
By understanding these key aspects of roasting chicken, you can confidently prepare a delicious and satisfying meal. Remember, practice makes perfect, and each roast brings you closer to mastering this culinary classic.
Part 12: Conclusion – Mastering the Art of Roast Chicken
Roast chicken is more than just a meal—it’s a timeless dish that brings people together, fills the kitchen with irresistible aromas, and delivers unbeatable comfort. Whether you prefer a classic buttery roast, bold global flavors, or a simple herb-infused preparation, mastering this dish ensures you’ll always have a go-to recipe for any occasion.
Key Takeaways from This Guide
1. Choosing the Right Chicken Matters
✔ Opt for organic, free-range, or pasture-raised chicken for the best flavor and quality.
✔ Select a 3.5–4.5 lb (1.5–2 kg) bird for even cooking and juicy meat.
2. Preparation Is the Secret to Flavor
- ✔ Pat the chicken dry and season under the skin for maximum taste.
- ✔ Stuff the cavity with aromatics like lemon, garlic, and herbs for an extra depth of flavor.
- ✔ Truss the chicken to ensure even cooking and juiciness.
3. Roasting Techniques for Perfection
- ✔ Start roasting at high heat (425°F/220°C) for crispy skin, then lower the temperature for even cooking.
- ✔ Use a meat thermometer to check for doneness (165°F/74°C in the thickest part).
- ✔ Let the chicken rest for 10–15 minutes before carving to keep the meat juicy.
4. The Right Side Dishes & Sauces Complete the Meal
✔ Pair with crispy roasted potatoes, buttery mashed potatoes, or a fresh salad.
✔ Elevate flavors with chicken gravy, chimichurri, lemon butter, or garlic aioli.
5. Storing & Reheating Without Drying Out
- ✔ Refrigerate leftovers for up to 4 days or freeze for up to 3 months.
- ✔ Reheat in the oven at 350°F (175°C) with a splash of broth for moisture.
- ✔ Repurpose leftovers into soups, salads, sandwiches, tacos, or fried rice.
Final Thoughts: The Joy of Cooking Roast Chicken
Cooking a perfect roast chicken is a skill worth mastering. It’s simple yet impressive, comforting yet versatile, and always satisfying. Whether you’re preparing a special family dinner, meal prepping for the week, or exploring international flavors, this dish is a culinary staple that never disappoints.
The best part? Once you’ve mastered the basics, you can experiment, innovate, and create your own signature roast chicken recipe!
What’s Next?
Now that you’re a roast chicken expert, it’s time to put your skills into action! Try different seasoning blends, experiment with side dishes, and impress your friends and family with a beautifully roasted bird.
If you found this guide helpful, share it with fellow food lovers—because nothing brings people together like a perfectly cooked roast chicken!
Happy roasting! 🍗🔥
Related posts:
 Top Corkscrew Pasta Recipes for High Flavor, Vibrant Meals & Ultimate Comfort
 The Most Traditional Food Served at a Derby Dinner: A Culinary Journey Through Kentucky’s Iconic Dishes
 What is Marry Me Chicken? A Creamy, Irresistible Dish You’ll Love!
 Is Baked Feta Pasta Healthy? Nutrition, Benefits & Tips
1 thought on “The Ultimate Guide to Roast Chicken: A Flavorful and Juicy Delight, Perfect Every Time!”