
How Can I Make a Bluey-Themed Birthday Cake at Home?
A Bluey-themed birthday cake is the perfect centerpiece for a fan’s special day! Whether you’re an experienced baker or a beginner, this guide will help you create a show-stopping cake. From choosing the right design to decorating it like a pro, we’ve got you covered. Get ready to impress your little one with a homemade Bluey birthday cake that’s both delicious and fun!
Part 1: Introduction for Homemade Bluey birthday cake
Understanding the Bluey Phenomenon
The Australian TV show Bluey has captured the hearts of children worldwide. With its relatable stories and adorable characters, it’s no surprise that kids want Bluey birthday cakes for their special day. From playful adventures to heartwarming family moments, this series is a favorite among both kids and parents.
Why Choose a Bluey-Themed Birthday Cake?
A DIY Bluey cake is more than just a treat—it’s a statement piece for your party! Making one at home allows you to customize it to your child’s preferences. You can experiment with different flavors, decorations, and designs while saving money compared to store-bought cakes. Plus, it’s a fun, creative project that adds a personal touch to the celebration.
Part 2: Planning Your Bluey-Themed Cake
Before you start baking, proper planning is key! From picking the right design to gathering supplies, these steps will set you up for success. A well-thought-out plan will make the process smoother and ensure your Bluey birthday cake turns out exactly as you envision.
Selecting the Right Cake Design
Choosing the perfect Bluey cake design depends on your skill level and available time. Here are some fun ideas to consider:
- Simple Bluey Cake – A single-layer round cake decorated with Bluey’s face using colored icing or edible images.
- 2D Bluey-Shaped Cake – A carved cake in the shape of Bluey, complete with fondant decorations.
- 3D Standing Bluey Cake – A more advanced design featuring a sculpted cake that resembles the full Bluey character.
- Bluey and Bingo Cake – A two-tiered cake showcasing both Bluey and Bingo, perfect for fans of the siblings.
If you’re a beginner, starting with a simple Bluey cake design is best. As you gain confidence, you can try more complex options.
Gathering Necessary Supplies and Ingredients
To bring your DIY Bluey cake to life, you’ll need the right tools and ingredients. Here’s a checklist:
Baking Tools
- Cake pans (round or square, depending on design)
- Mixing bowls and spatulas
- Electric mixer (for smooth batter and frosting)
- Piping bags and tips
- Fondant rolling pin
- Food coloring (blue, black, white, and tan for Bluey’s features)
- Cake turntable (for easier decorating)
Cake Ingredients
- Flour, sugar, eggs, butter, and baking powder (for the cake base)
- Milk or buttermilk (for a soft texture)
- Vanilla extract (for added flavor)
- Cocoa powder (if making a chocolate cake)
Decorating Ingredients
- Buttercream or fondant (for the Bluey design)
- Gel food coloring (for vibrant Bluey colors)
- Edible markers or black icing (to draw details like eyes and nose)
- Pre-made Bluey cake toppers (optional for quick decorating)
By having everything ready beforehand, you’ll avoid last-minute stress and enjoy a smooth cake-making process.
Time Management and Preparation Tips
Making a Bluey-themed cake involves multiple steps, so it’s best to plan ahead. Follow this timeline for a stress-free experience:
- 1–2 Days Before the Party: Bake the cake layers and store them in an airtight container. This prevents dryness and saves time on the event day.
- The Day Before: Prepare buttercream or fondant decorations. If using fondant, allow the shapes to dry overnight for better handling.
- The Morning of the Party: Assemble and decorate the cake. Keep it refrigerated until it’s time to serve.
Pro Tips for Success:
- ✔ Chill the cake layers before decorating to prevent crumbs from mixing into the frosting.
- ✔ Work in a cool environment to avoid melting fondant or buttercream.
- ✔ Use parchment paper to roll out fondant easily without sticking.
With a clear plan in place, you’re now ready to move on to the fun part—baking the cake!
Part 3: Baking Homemade Bluey birthday cake
Now that you’ve planned everything, it’s time to bake! A delicious Bluey birthday cake starts with a great base. Whether you prefer vanilla, chocolate, or something more adventurous, the right cake flavor will make your creation even more enjoyable.
Choosing the Cake Flavor
Your choice of flavor depends on personal preference and your guests’ tastes. Here are some kid-friendly options that work well for a Bluey-themed cake:
- Classic Vanilla Cake – A light and fluffy choice that pairs well with any frosting.
- Chocolate Cake – Rich and moist, perfect for chocolate lovers.
- Funfetti Cake – A festive option with colorful sprinkles inside.
- Lemon Cake – A slightly tangy, refreshing option.
If you want to make the cake extra special, consider layering different flavors. For example, a vanilla bottom layer with a chocolate top layer adds variety and excitement.

Step-by-Step Baking Instructions
Ingredients for a Moist Vanilla Cake (Serves 12-15)
- 2 ½ cups all-purpose flour
- 2 ½ tsp baking powder
- ½ tsp salt
- 1 cup unsalted butter (room temperature)
- 2 cups granulated sugar
- 4 large eggs
- 1 tbsp vanilla extract
- 1 cup whole milk
Baking Instructions
Step 1: Preheat & Prepare
Preheat your oven to 350°F (175°C). Grease two 8-inch cake pans and line them with parchment paper for easy removal.
Step 2: Mix Dry Ingredients
In a bowl, whisk together the flour, baking powder, and salt. Set aside.
Step 3: Cream Butter and Sugar
In a large mixing bowl, beat the butter and sugar together until light and fluffy (about 3 minutes). This step helps create a soft cake texture.
Step 4: Add Eggs and Vanilla
One at a time, add the eggs, mixing well after each addition. Then, stir in the vanilla extract.
Step 5: Combine Dry and Wet Ingredients
Alternately add the flour mixture and milk to the batter, starting and ending with the dry ingredients. Mix just until combined—overmixing can make the cake dense.
Step 6: Bake the Cake
Divide the batter evenly between the prepared pans. Bake for 30-35 minutes or until a toothpick inserted into the center comes out clean.
Step 7: Cool Completely
Let the cakes cool in the pans for 10 minutes, then transfer them to a wire rack to cool completely before decorating.
Nutritional Content (Per 100g Serving)
| Nutrient | Amount |
|---|---|
| Calories | 350 kcal |
| Carbohydrates | 45g |
| Protein | 5g |
| Fat | 17g |
| Sugar | 30g |
| Sodium | 150mg |
With your cake baked and cooled, you’re now ready for the next exciting step—decorating it to look like Bluey!
Part 4: Preparing the Decorations for your Homemade Bluey birthday cake
Now that your Bluey birthday cake has been baked and cooled, it’s time for the fun part—decorating! Whether you choose to work with fondant, buttercream, or edible images, this step will bring Bluey to life on your homemade cake.
Making Bluey’s Face with Fondant
Fondant is the best option for creating a Bluey-themed cake design with vibrant colors and clean details. Follow these steps to make Bluey’s face:
Fondant Colors Needed:
- Blue – for Bluey’s fur
- Light Blue – for the inner ears, belly, and eyebrows
- White – for the eyes
- Black – for the nose, pupils, and mouth
- Tan/Beige – for Bluey’s snout
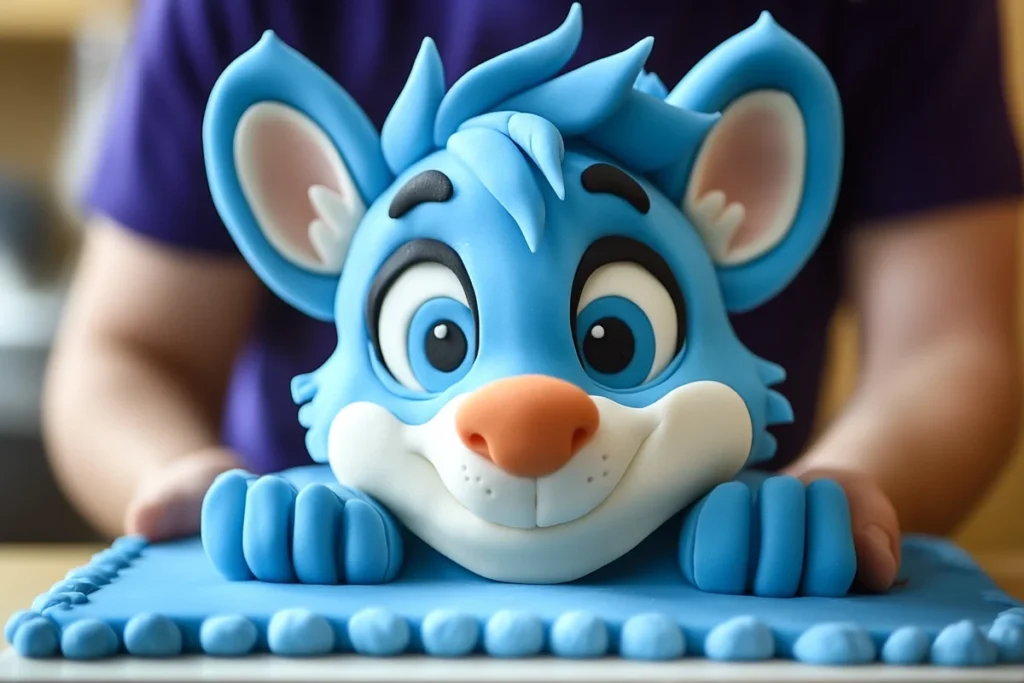
Steps to Create Bluey’s Face:
Step 1: Roll and Cut the Base
Roll out blue fondant to cover the entire cake. Smooth it out gently using a fondant smoother to prevent wrinkles or bubbles.
Step 2: Shape Bluey’s Features
- Cut an oval shape from tan fondant for Bluey’s snout. Place it slightly below the center.
- Use white fondant to make two large circles for the eyes. Add smaller black circles for pupils and position them slightly off-center to give Bluey an expressive look.
- Roll out black fondant to create Bluey’s nose and smile. Attach them carefully.
Step 3: Add the Details
- Cut two triangular pieces from blue fondant for Bluey’s ears. Add light blue fondant for the inner ear details.
- Use thin strips of light blue fondant to create Bluey’s eyebrows.
- Secure all fondant pieces with a small amount of water or edible glue.
Once all elements are in place, step back and admire your fondant Bluey cake!
Alternative: Using Edible Images and Toppers
If working with fondant feels overwhelming, don’t worry! You can achieve a Bluey-themed cake design with edible images and ready-made cake toppers.
Where to Find Bluey Cake Toppers
You can find Bluey cake toppers and edible images on sites like Mums At The Table. These make decorating much easier while still giving your cake a professional look.
How to Apply Edible Images:
- Print or purchase a pre-made edible Bluey image.
- Place it gently on a thin layer of buttercream to prevent air bubbles.
- Smooth it carefully with a fondant smoother or clean, dry hands.
This option is perfect for beginners who want an impressive design without the extra effort!
Incorporating Bluey’s Friends and Family
Want to take your Bluey cake design to the next level? Add other characters like Bingo, Bandit, or Chilli for a complete Bluey birthday scene!
Ways to Include Bluey’s Family:
- Use fondant cutouts of Bingo for a sibling duo cake.
- Decorate cupcakes with Bandit and Chilli designs alongside the main cake.
- Print edible images of the whole Heeler family and place them around the cake.
Adding more characters makes the cake even more special for Bluey fans!
With the decorations ready, it’s time to assemble the cake and bring everything together.
Part 5: Assembling the Cake
Now that your decorations are ready, it’s time to assemble your Bluey birthday cake! This step ensures that your cake is stable, looks great, and is easy to serve. Follow these steps to layer, ice, and decorate your cake like a pro.
Layering and Filling the Cake
A well-layered cake not only looks impressive but also tastes amazing. Here’s how to do it right:
1: Level the Cake Layers
- Use a serrated knife or cake leveler to trim the tops of the cake layers, creating an even surface.
- This prevents a lopsided cake and makes stacking easier.
2: Add the Filling
- Place the bottom cake layer on a cake board or stand.
- Spread a generous amount of buttercream or frosting evenly on top. You can use vanilla, chocolate, or even a blue-colored buttercream for a fun touch.
- Gently place the second cake layer on top and press down lightly.
3: Crumb Coat the Cake
- Apply a thin layer of frosting over the entire cake to seal in crumbs.
- Smooth it out with a spatula and refrigerate for 15–20 minutes before adding the final layer of icing.
A crumb coat helps achieve a polished look by preventing crumbs from mixing into the final frosting layer.
Applying the Base Icing Coat
Now that your cake is stable, it’s time to apply the final coat of icing.
Step 1: Choose Your Icing Type
You can use:
- Buttercream for a soft and creamy texture.
- Fondant for a smooth, professional finish.
If you’re using buttercream, consider coloring it Bluey’s signature blue with gel food coloring.
Step 2: Apply and Smooth the Frosting
- Use an offset spatula to spread a thick, even layer of buttercream over the cake.
- For a super smooth finish, use a bench scraper to glide along the sides while spinning the cake turntable.
If using fondant, roll it out evenly and carefully lay it over the cake, smoothing it with your hands or a fondant smoother.
Adding Decorative Elements
Now comes the most exciting part—decorating your Bluey cake design!
Step 1: Place Bluey’s Face on the Cake
- If you made a fondant Bluey face, gently position it on top of the cake.
- If using edible images, carefully apply them over the buttercream while smoothing out any air bubbles.
Step 2: Add Final Touches
- Attach fondant ears, eyes, and a nose in their respective places.
- Use piping tips to add borders, stars, or fur-like textures for extra detail.
- For an extra pop, add Bingo or other Bluey family members around the sides using smaller fondant figures or images.
Once everything is in place, step back and admire your homemade Bluey birthday cake!
With the cake fully assembled and decorated, it’s time to move on to final touches and presentation to wow your guests!
Part 6: Final Touches for Homemade Bluey birthday cake
Your Bluey birthday cake is almost ready! Now, let’s add those last little details that will make it extra special. From themed cake boards to personalized messages, these finishing touches will make your cake the highlight of the party.
Creating a Themed Cake Board
A well-decorated cake board enhances your Bluey cake design and gives it a polished, professional look.
How to Decorate a Cake Board:
- Cover the board with blue fondant or colored wrapping paper to match Bluey’s theme.
- Add fondant paw prints to resemble Bluey’s playful adventures.
- Use edible glitter or sprinkles to add a touch of magic.
- Write “Happy Birthday [Child’s Name]” with icing or edible markers.
A themed board makes your cake look even more impressive in photos!
Incorporating Personalized Messages
Adding a personal touch makes the cake more meaningful for the birthday child.
Ideas for Custom Messages:
- “Happy 4th Birthday, Emily!” – Written in piped buttercream or fondant letters.
- “Time for a Bluey Adventure!” – Adds a fun, playful vibe.
- “Let’s Play!” – A nod to Bluey’s energetic personality.
Use a piping bag with a fine tip to write messages neatly, or cut out fondant letters for a bold look.
Ensuring Food Safety and Allergen Considerations
Before serving, consider dietary restrictions and safety precautions:
Common Allergens in Cakes:
- Gluten: Found in traditional flour (use gluten-free flour if needed).
- Dairy: Present in butter and milk (substitute with almond or oat milk if necessary).
- Eggs: Can be replaced with flaxseed or applesauce for an egg-free option.
Safe Storage Tips:
- Keep the cake refrigerated if using dairy-based buttercream.
- Store leftovers in an airtight container to maintain freshness.
- If using fondant, avoid the fridge, as condensation can make it sticky.
With these final details complete, your homemade Bluey cake is now party-ready!
Part 7: Serving and Storing Homemade Bluey birthday cake
Your Bluey birthday cake is ready to impress! Now, let’s go over the best ways to serve it and how to store any leftovers to keep them fresh.
Optimal Serving Practices
To ensure that every guest gets a perfect slice, follow these serving tips:
How to Cut a Round Bluey Cake
- Use a sharp knife dipped in warm water for clean cuts.
- Start by cutting a small center circle, then slice outward in even portions.
- Serve on Bluey-themed plates for extra fun!

Portion Guide (Based on Cake Size):
- 6-inch cake – Serves 8–10 people
- 8-inch cake – Serves 12–15 people
- 10-inch cake – Serves 18–20 people
For tiered cakes, remove the top layer first, then slice each tier separately.
Storing Leftovers
If you have leftovers, follow these storage tips to keep your cake fresh:
Short-Term Storage (1–2 Days):
- Keep the cake in an airtight container at room temperature.
- If using dairy-based buttercream, refrigerate it to prevent spoilage.
Long-Term Storage (Up to 3 Months):
- Wrap individual slices in plastic wrap, then place them in a freezer-safe container.
- When ready to eat, thaw at room temperature for 30–60 minutes before serving.
By storing your cake properly, you can enjoy the delicious flavors even after the party is over!
With everything done, your homemade Bluey cake is sure to be the highlight of the celebration. Happy baking! 🎂🎉
Conclusion: Bringing Your Homemade Bluey Birthday Cake to Life
Creating a Bluey birthday cake at home is a fun and rewarding experience that brings joy to both the baker and the birthday child. From planning the perfect design to baking, decorating, and serving, each step allows you to customize the cake to match your child’s love for Bluey.
Whether you choose fondant decorations, edible images, or a simple buttercream design, the key is to enjoy the process and have fun! Even if your cake isn’t bakery-perfect, the effort and love you put into it will make it even more special.
By following this guide, you now have the knowledge and confidence to create a show-stopping Bluey cake that will impress family and friends. So, put on your apron, gather your ingredients, and get ready to bake a cake that will make your little Bluey fan’s birthday unforgettable! 🎂🎉


1 thought on “How to Make a Bluey-Themed Birthday Cake at Home (Easy Guide!)”